

The World of Collegiate Cycling
by Nitish Nag
With the massive growth of high school cycling through the recent inception of the National Interscholastic Cycling Association (NICA), we are seeing a huge boost in the amount of junior cyclists across the country. This is super exciting and promising for the sport to grow in a sustainable manner for the future... More>
It's in Your Hands Now
by Dario Fredrick
In the most recent installment from our precision bike fitting series, By the Seat of Your Shorts, we looked at various aspects of saddle selection and placement, which followed the first article in the series, Start at the Foot to Reach the Peak Fit. Progressing to the final point of the three-contact-points fitting model, we come to the front end of the bike: the handlebars... More>
Group Running Workouts - Starting March 5th, 2011
with coach Jeff Peterson
SATURDAYS - Drills, Stretching, Intervals, Coach led workout
Location - Piper Park, Larkspur (across from Redwood HS) Meet behind the East Softball Field
Time - 11:30AM
Who? - All levels welcome.... Marin Marathon prep, Dipsea Prep, first 5k/10k, general fitness...it's all good!
SUNDAYS - Whole Athlete Long Runs
Meet at 7:45 AM at Ross Common
Long social run with a group of motivated runners. Several options for great trails runs, 4miles long all the way to 20miles.
Run Package - $40 per month, $12 drop in on Saturdays. More info>
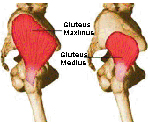
Avoid Hip & Knee Pain with Gluteus Medius & Maximus Training
by Tom Rosencrantz
As we continue to put in the miles of our chosen sport, we have a tendency to over develop certain muscles while others may become de?cient or weak, creating imbalance and often times pain in our bodies. Sometimes stretching, yoga and massage may not be enough to keep us on a pain free, healthy course.

Welcome New Whole Athlete Coach Matt McCourtney
Since youth sports, Matt competed at a high level and ending up being ranked top-10 in the state for Junior tennis. Bouncing from sport to sport, he had yet to find his passion, and in turn, gave up sports all together during college to pursue a degree in chemical engineering and fine art. As college came to an end, Matt choose to become a professional Commercial Photographer as he found his passion mixing the balance of Art and Science and learning how to apply both to life.
Product Spotlight: RestWise
Optimal recovery has always been a fundamental part of Whole Athlete's holistic approach. Now, there's a tool that helps quantify recovery, using multiple variables inlcuding sleep, stress, oxygen saturation, waking heart rate and more. Sounds complicated? Well it's not. In fact, it's surprisingly easy to use and provides a simple recovery score each day, helping athletes and coaches make good choices in training. More>

Visualization
by Marvin Zauderer
It's easy, it's free, and it works for many. With visualization, you can build self-confidence, rehearse riding skills, simulate handling challenging situations, and approach the actual experience of achieving any of your goals all in the cozy corners of your own mind. The mentally fit cyclist harnesses the power of the imagination to improve performance on the bike.

Recipe: Granola-Cessity
by Abbie Durkee
1/3 cup Coconut Oil,
1/2 cup Maple Syrup,
1/2 cup Honey,
6-10 cups of Oats
1 cup of almonds, chopped coarsely
1/2 cup shredded coconut
1/4 cup dried blueberries

Whole Athlete-Specialized Cycling Team Kicks Off 2011 Season
1/3 cup Coconut Oil,
Holistic Performance Newsletter - Vol. 20, Winter 2011
The World of Collegiate Cycling
by Nitish Nag
With the massive growth of high school cycling through the recent inception of the National Interscholastic Cycling Association (NICA), we are seeing a huge boost in the amount of junior cyclists across the country. This is super exciting and promising for the sport to grow in a sustainable manner for the future.
But what happens to all these high school cyclists as they head to college? (Insert superhero music) Collegiate Cycling! Because collegiate cycling gets much less media exposure than high school cycling, many do not even know how it works or even that it exists. The idea was founded initially as the National Collegiate Cycling Association in 1985, and is now under the governance of USA Cycling as the USA Cycling Collegiate (usacycling.org/collegiate). Where as NICA (nationalmtb.org) currently focuses on mountain biking, due to the benefit of safety and ease of introduction that mountain biking offers to beginner cyclists, collegiate cycling encompasses road, mountain bike, track and cyclocross (essentially all disciplines of bike racing other than BMX racing). This is really cool because all types of cyclists have a place in the collegiate program.
A huge aspect of collegiate cycling is the team. Both women's and men's points from races combine to provide the score for the school's ranking. Also, ALL categories count towards points for the school (beginner to the elite levels). This is builds some awesome friendships from the lower categories all the way to the fastest categories. Collegiate cycling also has a huge range of riders that compete. Many riders discover racing for the first time through collegiate cycling, and learn the ropes of this great "bike racing" lifestyle. Other racers are very experienced and vie for the coveted leader's jersey and travel across the nation for National Championship events.
The season is split up so that riders can compete in all disciplines. Road racing is in the spring, track in the summer, MTB in the fall and cyclocross in the winter. In addition, each season of racing has a series of races that are hosted by each school. The races are fully promoted by the students themselves! No third-person race promoters chew up extra cash, and it keeps the whole program affordable. Also, the athletes get to travel to all the different campus locations across their region and enjoy true "home courses".
Points accumulate for both the team and the individual racers. Top individuals fight for the yellow omnium leader's jersey. The crazy part about this is that you really have to be a well-rounded racer to be on the omnium podium. For example in the MTB season, your points accumulate from XC, Short Track XC, Downhill, Dual Slalom, 4-Cross, and Super D events! Most seasons have a race every weekend with 3-4 races per weekend keeping racers busy.
Especially without the "adult" supervision that governs most of high school cycling, collegiate cycling has as a very relaxed atmosphere. On the race-course and off, all the schools cheer for all their enemy schools. Following racing, students from all the schools hang out, either camping or out in the city depending on the race location. What happens during this hanging out might be too fun to disclose in this article. The only way to find out is to come out and enjoy the collegiate cycling scene!
Well that's a wrap and hope to see you out on the race course!
Nitish Nag is a Whole Athlete Associate Coach currently completing a triple major at UC Berkeley, including lab research in exercise physiology and human performance. He showed his all-around cycling ability by taking 4th place overall in the Collegiate National Championships Division 1 Men's Omnium - combining cross country, short track and downhill.
by Dario Fredrick
In the most recent installment from our precision bike fitting series, By the Seat of Your Shorts, we looked at various aspects of saddle selection and placement, which followed the first article in the series, Start at the Foot to Reach the Peak Fit. Progressing to the final point of the three-contact-points fitting model, we come to the front end of the bike: the handlebars. To simplify the wide array of variations and applications, let’s divide handlebars into three main categories: flat and riser bars (mountain bike), drop bars (road, cyclocross & track), and aero bars (time trial & triathlon). Each of these categories in itself deserves a separate article, but rather than go into full detail here, we will examine some of the fundamental differences within each category and touch upon preliminary setup and general fitting characteristics of each.
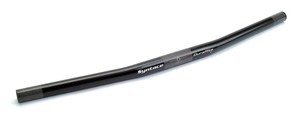
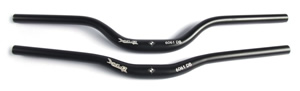
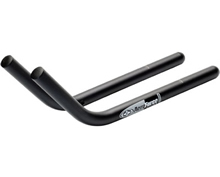
Flat and Riser Handlebars
Typically found on mountain bikes, but occasionally on road, touring or town bikes as well, flat bars are measured by their length and sweep. Most flat bars come very wide, allowing them to be cut down to the desired width. Sweep variations accommodate different lateral angles at the wrist and range from five to 11 degrees or more. Riser bars are simply flat bars with vertical rise, also coming wide enough to be cut down if desired, varying from as little as 15 mm to as much as 50 mm of rise and more. Riser bars conveniently allow a change in saddle to handlebar drop without altering stem length or angle. Keep in mind that rotation of the bars directly affects both sweep and rise relative to your position.
 |
 |
Orientation of the controls (shifter and brake levers) on flat and riser bars is often overlooked, but proper positioning can really improve handling and control. While holding the grips where your hands are most comfortable, you should be able to extend your index finger forward and contact close to the end of the brake lever. If using disc brakes, a single finger is often all you need, and pulling at the far end of the lever provides maximal leverage and power while keeping most of the hand on the grip when descending.
Where do you place the bars to accommodate the appropriate reach and drop/ rise? Assuming your saddle position has been optimized, a neutral mountain bike position is one where your torso and arms are approximately 45 degrees to horizontal. This is very general setup, but a safe place to start for many people. The handlebar width selected is highly individual, particularly on the mountain bike. Wider bars can give a bit more stability at higher speeds, but can limit technical handling, especially at slower speeds or climbing. A very general guideline to translating road to MTB bar width would be to multiply your road bar size by 1.5. Be conservative when first cutting down your bars. You can always cut more, but once they’re cut...
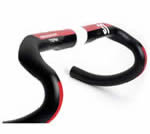
Drop Handlebars
Drop bars have evolved quite a bit over the years, but still retain the same general shape. Most drop bars fall into classic/ traditional bend (semicircular curved drops) or anatomic bend (angular or shaped-curve drops) categories. The three primary dimensions of drop bars are width (typically measured center to center), reach and drop. Width should be selected based on your shoulders, matching the center to center width of the humerus heads. Or if you prefer a wider feel, match the bar to your outer shoulder width measurement. Reach is the distance from the center (where the stem clamps) to the forward-most point at the front of the drops, while drop is simply the vertical depth of the drops also measured from the bar center. The shape of the drops can vary considerably and affects the positioning of your hands relative to the levers. The diagram below illustrates different bar shapes – note that actual dimensions vary by model and manufacturer.

To set up drop handlebars, first angle the bars so that the shape of the drops feels best to you and puts your hands in a favorable position relative to the brake lever for descending or cornering at speed. Keep in mind that if you rotate the bars up, it effectively increases the reach measurement of the bar. Then adjust the placement of the shifter/ levers so that the orientation allows both a comfortable position on the hoods and the ability to reach the brake levers from the forward part of the drops. When adjusting the anatomical reach (distance from the saddle to the bars) and handlebar drop from the saddle, be sure that saddle position has first been optimized for pedaling biomechanics then orient the bars relative to the saddle.
Proper positional/ anatomical reach and drop for the bike are highly specific to the rider. The only rules of thumb are to be sure that the position on the lever hoods is your primary, go-to position, and can be maintained without strain or difficulty. Arms should have a slight bend at the elbow (never locked) and shoulders should be allowed to relax. There should certainly be some weight into the hands, necessary for proper handling and weight distribution, but it should not create excessive fatigue (note that sometimes saddle discomfort is due to an unnecessarily upright posture seeking to avoid any weight on the hands). You should also be able to descend relatively comfortably in the drops, with the ability to reach the brakes without compromising hold of the bars while keeping your head up to maximize visual perception and balance.
Aero Handlebars
Time trial and triathlon positions are very specific and mostly fixed, often challenging the body’s limits of flexibility and power. There are myriad options of aero bars and aero fitting is a multi-step process when done right. Nonetheless, we’ll touch on some of the very basic aspects of aero bar selection and preliminary set up here.
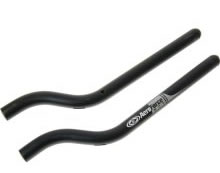
Aero bars have two distinct segments: the base bar and aero extensions. There are one-piece integrated base and aero bars available, but I don’t recommend them until you have perfected your position, as they tend to be virtually non-adjustable. Separate base bar and clip-on aero bar extensions offer much more variability in positioning and aero extensions come in a variety of shapes, ranging from straight to R-bend, S-bend or L-bend (sometimes called ski bend).
 |
 |
 |
S-bend |
R-bend |
L-bend |
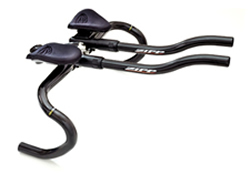
Why use an aero bar setup in the first place? Most cyclists are seeking to alter the shape of their body on the bike to minimize air resistance and maximize speed for a given power output, while some use aero extensions for an additional position or added comfort on long rides. Some cyclists simply convert their road bike setup by clamping aero bars to drop bars. To make this work, the drop bars must be aluminum or carbon models rated to allow clip on bars, and the aero extensions need to be fairly short to prevent overly stretching out the front end of your position. Try to keep the angle of your shoulder/ torso and elbows both at approximately at 90 degrees, which often means tilting the aero bars upward.
 |
 |
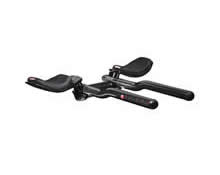
Drop bars with clip-on extensions |
Integrated one-piece base/aero bars |
 |
|
Separate base & aero bars |
|
For the more traditional time trial/ triathlon bike setup, the base bar width should be as narrow as the center to center width of your shoulders. Very generally speaking, the aero extensions should allow your elbows to come under your shoulders or close to it, with the elbow angle close to 90 degrees and hands able to hold the bar end shifters. Keep in mind that the shape of the aero bar (e.g. R-bend vs. L-bend) and height of the armrest pads both play a role in the elbow angle. The width of the armrests should be only as narrow as you can maintain without strain and without impeding full breathing at high intensity.
The vertical drop from the saddle to the armrest pads should only be as low as your ability to maintain a controlled pedal stroke, good power - and most important to aerodynamics - allow your head to drop low while looking forward. The high point of the helmet is typically the highest point of a cyclist’s aero-profile, and keeping it down is one of the most significant ways to reduce aerodynamic drag.
Getting a Handle on the Right Bar
Most handlebars come in both aluminum and carbon options. Aluminum is less expensive and more durable, while carbon tends to be lighter and can dampen vibration. If selecting a flat or riser bar, consider the width, sweep and rise. The controls, especially the brake levers, should easily accessed without compromising a stable hand position on the grips. For drop bars, recognize the variability in reach and drop dimensions as well as overall shape, making sure they fit your hands well. You should be able to use all of the available positions without difficulty (including the drops) otherwise your fit can be improved. For aero bars, pick the extensions that are most appropriate to optimize your position where you can rest your arms easily and hold the ends without strain while producing good power. With so many bars to choose from, don’t settle for less than what works best for your body. The optimal fit is in your hands now.
Whole Athlete founder, Dario Fredrick brings a unique blend of experience and well-rounded qualifications to the bike fitting profession. With over a decade of experience fitting a multitude of cyclists, a Master's degree in applied exercise science including formal training in biomechanics, 13 years teaching Iyengar Yoga and an accomplished cyclist himself, Dario is uniquely qualified in the fitting world. His fitting philosophy is to work with each individual in a holistic fashion without limits or confines of any one fitting system, formula or tool.
Group Running Workouts - Starting March 5th, 2011
with coach Jeff Peterson
SATURDAYS - Drills, Stretching, Intervals, Coach led workout
Location - Piper Park, Larkspur (across from Redwood HS) Meet behind the East Softball Field
Time - 11:30AM
Who? - All levels welcome.... Marin Marathon prep, Dipsea Prep, first 5k/10k, general fitness...it's all good!
SUNDAYS - Whole Athlete Long Runs
Meet at 7:45 AM at Ross Common
Long social run with a group of motivated runners. Several options for great trails runs, 4miles long all the way to 20miles.
Run Package - $40 per month, $12 drop in on Saturdays.
Avoid Hip & Knee Pain with Gluteus Medius & Maximus Training
by Tom Rosencrantz
Fall is a great time to purchase a new bike. The next year’s models are out so you can pick up the latest and greatest, or you can scoop up a bargain on current model year rides that shops are eager to move off the floor. But before you pull the trigger on your dream ride, come down and let us make sure it will be the right size.
With such a wide variety of geometries and bike models out there, it can be overwhelming selecting the right one. It is difficult to know what bikes will fit you well unless you know your optimal fit first. Your unqiue fitting dimensions are based on more than just your height, inseam or body proportions - they are defined by how your body integrates with the bike, by your biomechanics, flexibility and/or injury history. Your fit defines your bike.
With the Precision Bike Fitting for New Bike Purchase, we will fit you to your current ride, or use our Size Cycle fitting bike to determine your ideal fit. Then, based on your current measurements and after discussing your budget, preferred brands and shops, we will model potential bike options using BikeCAD to diagram how each bike will fit you, right down to the stem length and number of headset spacers. Finally, once you pick up your new ride, we will fine-tune your fit to complete the process. Don’t leave such a significant investment up to chance - let us insure that your next bike fits just right. To schedule an appointment, contact Peter Nicholson at peter@wholeathlete.com.
Tuning your Mountain Bike Suspension for Optimal Performance
by Nitish Nag
Suspension tuning is a key component for getting the most out of your expensive bike. Many riders set their suspension according to the books and never touch it again. This system is fine if you are recreationally riding and do not want to hassle over your suspension.
For riders looking to really milk the performance out of their rigs, suspension knowledge and tuning is key. Without the knowledge of how the suspension works, it is difficult to assess and analyze your suspension system. Let's go over some basics.
There are two components to a suspension system, the spring and the damper. The spring provides the force to suspend the rider from the ground and the damper controls the speed at which the spring moves. The spring is set based on the weight of the rider whereas the damper is set not only based on the weight but also on the terrain and riding style. An increase in damping further slows the rate of the spring. Picture a pogo stick. Without damping your suspension would act like a pogo stick going up and down at the fastest rate the spring can propel the weight. What a damper does is slow down the pogo stick so that you do not get bucked from your suspension (like a rodeo bull rider). Compression damping controls how fast the spring is squished down and rebound damping controls the spring as it returns back up. Furthermore, there are settings like lockout thresholds and much more that are specific to each brand.
The first adjustment that takes priority is the spring. Most shock companies base their recommendations on the spring settings purely on sag. While most of the time this works well, it is not customized for the particular riding style of the rider. If you are an aggressive rider you might want to run a higher pressure than recommended. This will prevent you from blowing through the travel on your bike when in an aggressive situation. It also helps keep your head angle slacker during hard turning, especially in berms where you reach a high G-force. A slightly higher pressure also helps prevent quick and premature brake dive. Some rear suspension designs heavily depend on an exact sag level such as virtual pivot point designs, and thus should still keep the sag level close to the manufacturer recommendation. Other designs like single pivots, Horst Link 4-Bar (aka FSR), and others are not so sensitive to changes in sag. Be sure to play around with your spring settings to really get a feel for what the suspension range is. A difference of 3 psi in air shocks is usually enough for an experienced rider to feel a change.
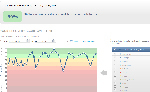
n accurate way to play with suspension is to use the bracketing system. In this system you do a practice run with a very low setting then a run with a high setting. See diagram below:
By using bracketing you can ensure that you have truly experienced the full range of the suspension settings and thus pick the best one for your specific needs. For those of you old school, die hard XC racers most modern suspension designs do not perform well if the pressure is too high, and this is a great way to reap the benefits of tuning. Mark your final desired pressures and damping clicks with a sharpie on the lowers or crown on the fork and shock. By doing this you will never need to worry about forgetting your correct settings.
The setting of the Lockout Threshold for many designs like the Specialized/FOX Brain, the FOX RP23 and, Manitou R-Type and Rock Shox Motion Control are varied in the way they work, but a general principle unifies them all. The “platform” should be set just enough so that the suspension is stiff while the rider is standing/sprinting/climbing normally, and not any higher. If you are coming off of a hardtail on to a cush bike, the pedaling style is a bit different and you need to change your technique while standing especially. By setting the threshold at the bare minimum needed, the suspension can actually be active for the maximum amount of time. Any extra threshold for the platform does not provide additional efficiency! A trick for Fox RLC Fork owners to mimic a platform is to set the lockout blow-off threshold at the lowest setting, and then leave the lockout ON for smoother sections. The low blow-off threshold will give way relatively easy and mimic a platform design. The next major component of your suspension settings is damping. Compression damping for XC style bikes is usually set to be as low as possible (low = less damping = faster speed of the spring), without blowing through your travel. Set the compression damping so that you just minimally don’t bottom out your suspension (usually a loud clunk) on your rides. Thus you are using the full range of your suspension for the style of riding you do. If you travel to a location where the riding is rougher, you will need to increase the damping (to slow the rate of squishing the spring), so that you do not bottom out. The inverse applies when going from rough trails to smooth trails. Many bikes do not even come with adjustments for compression, because the manufacturer sets it to a predetermined level. If this is the case, do not worry! If you are in dire need to change the amount of compression for your weight/style/terrain, then there are several ways to do that. Since going over all the ways is complex (shims, drilling holes, stacks, and more), the most fool-proof way to do this is to change the weight of the damping oil to a thicker or thinner fluid. If not satisfied, then more advanced measures are appropriate. On the flip side (literally), we have rebound damping. An important concept to understand about rebound of the fork is packing. When you hit several bumps in a row very rapidly, you do not want the rebound damping to prevent the fork from returning to its full travel before the next bump. If the rebound setting is too high (the fork returns too slowly), then the fork will compress, and further compress, and eventually all your suspension will run out! For this reason, you want your rebound damping set so that packing does not occur. At the same time, you do not want to get bucked from the suspension, so the rebound damping should be high enough to prevent that. The best way to feel this (for both compression and rebound) is to use the bracketing system as mentioned above. An easy test to ensure your rebound is at a good starting point is the curb test. Set your rebound to full fast (least amount of damping). Then ride off the curb as a drop (landing with both wheels even on the pavement). The suspension usually will cycle twice or more, like a bounce. Start adding one click at a time an increase in the rebound damping until your fork only cycles once off the curb drop. This removes the oscillation of the bouncy fork, while ensuring that you are not using too much rebound that would cause packing. Almost all mid to high level suspension designs have a rebound setting. If you are riding really bumpy and chattering trails, you must especially pay special attention to packing and rebound damping settings.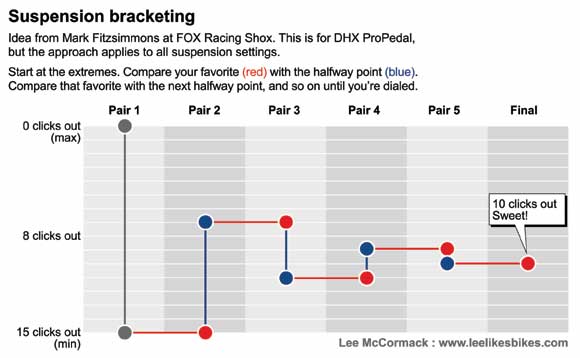 .
.
Now go out and test ride, tune and fine tune that suspension until it is dialed! Usually keeping a notebook of what changes you made prior to each “run” or small loop is useful to track what affects what. Another tip is to change only one thing at a time, then re-test the bike on the trail. Thus you will know which single change caused that difference. Otherwise you would be confused. Think of the basic scientific method when tuning (hypothesis, methods of tuning, keeping all variables except for one constant, noting results, interpreting what to do next). Good luck and hope to see you shredding out there!
Whole Athlete coach Nitsh Nag is currently completing a triple major at the University of California Berkeley in Molecular and Cell Biochemistry, Nutritional Physiology and Metabolism and Integrative Biology with an emphasis on Kinesiology. In his spare time he races pro on the mountain bike, recently landing on the podium at the US Collegiate National Championships in the Omnium (XC, STXC & DH). Feel free to contact Nitish at nitish.nag@gmail.com with any questions.
Bont Shoes
At Whole Athlete, we are constantly looking for new ways to improve your comfort and performance on the bike. Bont shoes, with their fully heat-moldable soles, are our latest discovery. The concept is simple: warm the shoe up in an oven, put it on your foot, shape the sole of the shoe so it conforms precisely to the sole of your foot. We do this here at the shop and you leave with your best-fitting pair of cycling shoes ever. The Bonts offer an extremely low stack height (distance between pedal and foot) and we are able to custom drill the cleat holes if your anatomy warrants it. Right now we are offering the a-one road shoe (just like new World Road Race Champion Thor Hushovd wears) and the tri-specific sub-9 for $399, plus the a-two and sub-9 for $315. For more information, visit http://www.bont.com/cycling
Fizik Versus Saddles
Fizik has established themselves as a dominant player in the saddle market and many of our athletes love both the long and flat Arione and the shorter, curvier Aliante. But some riders have found their perches to induce the dreaded perineal numbness. We all know numb is no good, so it's was with a sense of relief and excitement that we started carrying Fizik's brand new line of VS saddles. Basically, the VS line is your favorite Fizik saddles with a pressure-relieving channel. It's not a cut-out (which some riders find places too much weight on their sit bones) but a depression designed to be just deep enough to increase blood flow where you need it most. So drop us a line to check them out - we even have a few tester saddles in the studio. http://www.fizik.it
For more information, contact Peter Nicholson at peter@wholeathlete.com.